

0x00 前言
去年我发过两篇讲解自动化加解密的文章:JS逆向系列07-实战详解如何实现自动化加解密和JS逆向系列08-双层mitmproxy代理实现自动化加解密,我原本以为自动化加解密系列至此就结束了,但是我目前又遇到了一个更为麻烦的问题:如何实现非对称自动化加解密,已经有不止一位师傅问过我这个问题,直到我前两天发布了Hook JSEncrypt RSA脚本才有机会向大家写这篇文章。
注:
1.本文仅针对前端中的非对称加解密。
2.本文仅针对前端加密库JSEncrypt。
3.本文仅针对非对称加密中的典型算法–RSA。
4.本文仅会讲解前端在进行非对称加密时如何实现自动化加解密,不涉及到前端存储私钥解密响应的情况。
5.本文有些地方可能不会去讲过多的细节,因为已经在前两篇文章中讲过了,读者可自行阅读:JS逆向系列07-实战详解如何实现自动化加解密和JS逆向系列08-双层mitmproxy代理实现自动化加解密。
0x01 非对称加密
我对那些加密算法的了解可谓是知之甚少,我只知道这些加密算法的一个基本加密流程,所以接下来我会为大家讲述一下非对称加密的加密流程。
非对称加密是一个大类,是一种加密技术的统称。RSA是这个大类下的一个具体实现方案,
RSA加解密具体流程:

这就是RSA加密的一个基本流程,其中这也体现出了我们想要对其实现自动化加解密的一个最大的难点:我们没有私钥,也就无法对原密文进行解密,从而无法实现自动化加解密。
在以前的文章中,我无一例外都是通过mitmproxy抓包进行解密,然后在burp中显示出解密后的明文。但是在非对称加密中就实现不了了,因为我们没有私钥。在非对称加密中,只有私钥才能对密文进行解密,所以接下来我将为大家讲述我是如何实现非对称自动化加解密的。
0x02 实现非对称自动化加解密
在讲述具体流程之前,我还需要为大家介绍一个库:JSEncrypt,其中这也是本文针对的一个加密JavaScript库。JSEncrypt是一个专门用来实现RSA加密的JS库,我们能通过引入这个库快速实现RSA加解密,例如下面是一个示例:
<!doctype html>
<html lang="zh-CN">
<head>
  <meta charset="utf-8">
  <meta name="viewport" content="width=device-width,initial-scale=1">
  <title>JSEncrypt RSA 加解密示例</title>
</head>
<body>
  <h2>JSEncrypt RSA 加解密示例</h2>

  <button id="genBtn">生成密钥对(1024位)</button>
  <p>公钥(Public Key):</p>
  <textarea id="pub" rows="6" cols="80" placeholder="生成或粘贴公钥"></textarea>
  <p>私钥(Private Key):</p>
  <textarea id="priv" rows="10" cols="80" placeholder="生成或粘贴私钥"></textarea>

  <hr>
  <p>要加密的明文:</p>
  <textarea id="plain" rows="4" cols="80" placeholder="在这里输入要加密的文本"></textarea>
  <br>
  <button id="encBtn">使用公钥加密 → Cipher(Base64)</button>
  <p>密文:</p>
  <textarea id="cipher" rows="6" cols="80" placeholder="加密后结果(Base64)"></textarea>

  <hr>
  <button id="decBtn">使用私钥解密 → 明文</button>
  <p>解密结果(明文):</p>
  <textarea id="decrypted" rows="4" cols="80" placeholder="解密结果显示在这里"></textarea>

  <!-- 引入 JSEncrypt 库(通过 CDN) -->
  <script src="https://cdn.jsdelivr.net/npm/jsencrypt@3.0.0/bin/jsencrypt.min.js"></script>
  <script>
    // 生成密钥对并填入页面(1024 位)
    document.getElementById('genBtn').addEventListener('click', function () {
      // JSEncrypt 支持传入 default_key_size 参数
      const gen = new JSEncrypt({ default_key_size: 1024 });
      // 触发生成内部 key 对象
      gen.getKey();
      const publicKey = gen.getPublicKey();
      const privateKey = gen.getPrivateKey();
      document.getElementById('pub').value = publicKey;
      document.getElementById('priv').value = privateKey;
      alert('已生成密钥对并填入公/私钥文本框(1024 位)');
    });

    // 加密(用公钥)
    document.getElementById('encBtn').addEventListener('click', function () {
      const pub = document.getElementById('pub').value.trim();
      const plaintext = document.getElementById('plain').value;
      if (!pub) { alert('请先生成或粘贴公钥'); return; }
      if (!plaintext) { alert('请输入要加密的明文'); return; }

      const encryptor = new JSEncrypt();
      encryptor.setPublicKey(pub);
      const encrypted = encryptor.encrypt(plaintext);
      if (!encrypted) {
        alert('加密失败(可能是明文过长或公钥无效)');
        return;
      }
      document.getElementById('cipher').value = encrypted;
    });

    // 解密(用私钥)
    document.getElementById('decBtn').addEventListener('click', function () {
      const priv = document.getElementById('priv').value.trim();
      const cipher = document.getElementById('cipher').value.trim();
      if (!priv) { alert('请先生成或粘贴私钥'); return; }
      if (!cipher) { alert('请先生成或粘贴密文或使用上面的加密按钮生成密文'); return; }

      const decryptor = new JSEncrypt();
      decryptor.setPrivateKey(priv);
      const decrypted = decryptor.decrypt(cipher);
      if (decrypted === false || decrypted === null) {
        alert('解密失败(密钥或密文可能不匹配)');
        return;
      }
      document.getElementById('decrypted').value = decrypted;
    });
  </script>
</body>
</html>
这是我让gpt写的一个示例,效果:

前两天我发布了我自己写的Hook JSEncrypt RSA脚本,我给大家看一下效果:

可以看到在加密时输出了公钥、原始数据和密文,解密时输出了私钥、原始数据和明文。
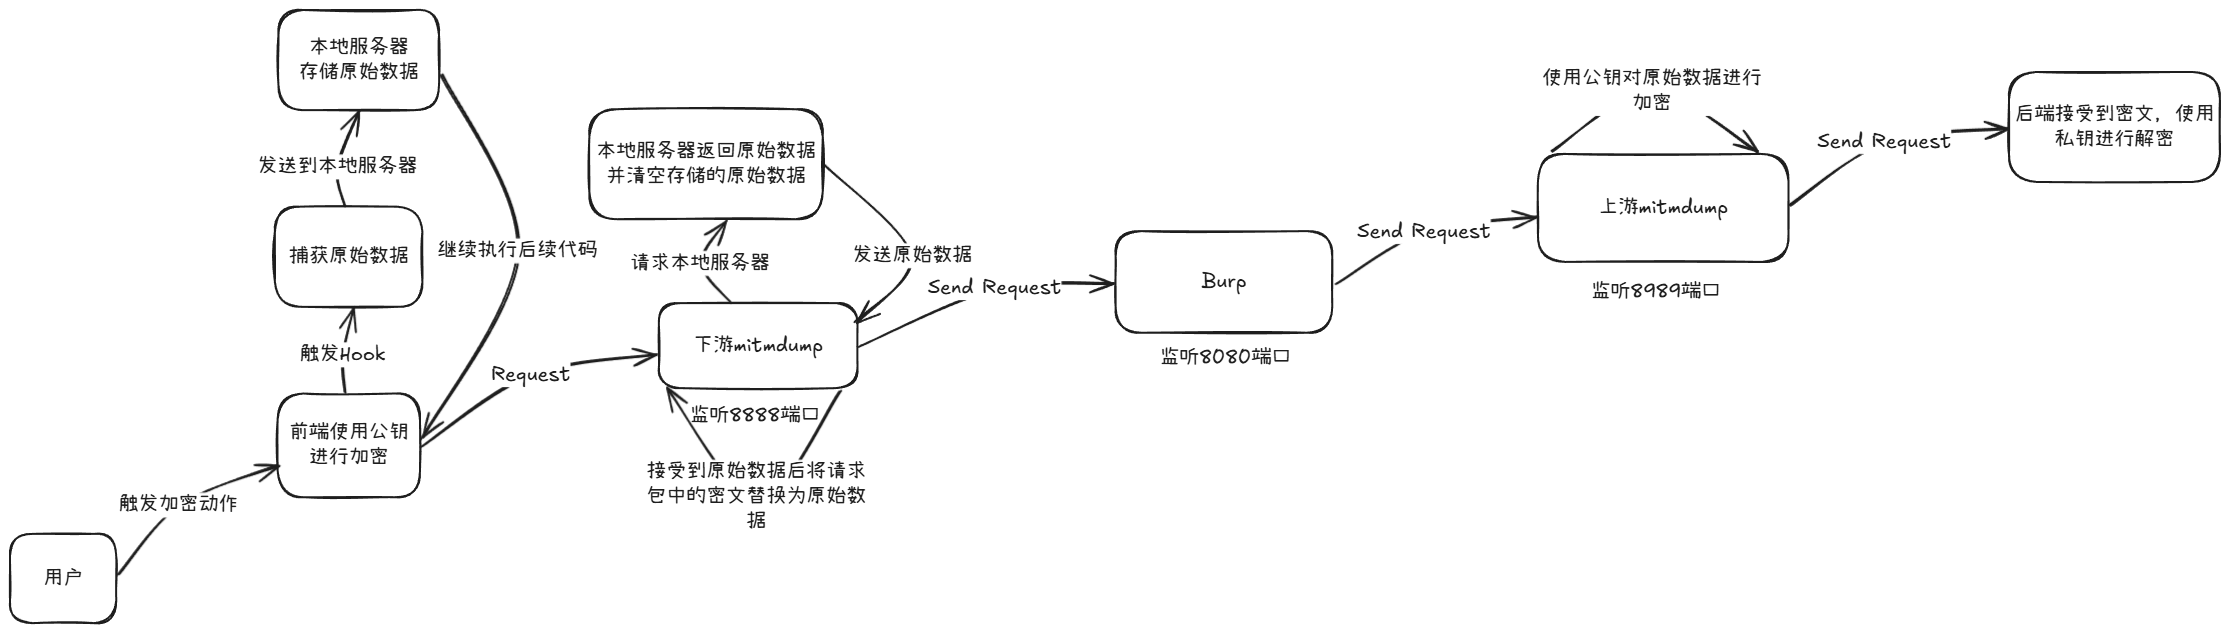
此时我不知道有没有读者能猜到我会怎么实现非对称自动化加解密,其实很简单,下面是我构思的整个加解密流程:

可以看到整个加解密流程比较长,不过不着急,我一步一步带大家实现。
整个加解密流程涉及到四个文件:
1.本地服务器
2.Hook JSEncrypt RSA脚本
3.下游mitmproxy代理
4.上游mitmproxy代理
0x03 搭建本地服务器
各位可以从上面的加解密流程中发现,实现非对称加解密需要搭建一个本地服务器,用来接受并存储原始数据,这里我就拿flask进行搭建:
from flask import Flask, request, jsonify
from flask_cors import CORS

app = Flask(__name__)

# 启用 CORS
CORS(app)

# 全局数组
data = []

# 第一个接口 /request,用来接收 GET 参数 text 并存储到数组中
@app.route('/request', methods=['GET'])
def request_text():
    text = request.args.get('text')
    if text:
        data.append(text)
        return jsonify({"message": "Text added successfully"}), 200
    else:
        return jsonify({"error": "No text provided"}), 400

# 第二个接口 /get,用来返回存储的数组,并清空数组
@app.route('/get', methods=['GET'])
def get_data():
    global data
    result = data.copy()
    data = []  # 清空数组
    return jsonify(result), 200

if __name__ == '__main__':
    app.run(debug=True)
这是我让gpt写的一段python flask,其中有几点我需要讲解:
1.服务器要支持跨域请求,因为我们的hook脚本是作用在其他域上。2.接口/request用来接受hook脚本发送的原始数据,并保存在一个数组里。3.接口/get用来返回存储的数组并清空数组。这里的清空数组我需要着重讲一下:因为每次请求可能都会进行一次加密,原始数据可能不一样,所以本地服务端存储的原始数据要进行清除,防止冲突。当mitmproxy请求本地服务器时说明前端加密已经完成,此时将原始数据返回给mitmproxy后就可以清除本地存储的原始数据。
0x04 修改Hook脚本
// ==UserScript==
// @name         Hook_JSEncrypt_RSA
// @namespace    https://github.com/0xsdeo/Hook_JS
// @version      2025-10-24
// @description  Hook JSEncrypt RSA
// @author       0xsdeo
// @run-at       document-start
// @match        *
// @icon         data:image/gif;base64,R0lGODlhAQABAAAAACH5BAEKAAEALAAAAAABAAEAAAICTAEAOw==
// @grant        none
// ==/UserScript==

(function () {
    'use strict';

    function hasRSAProp(obj) {
        const requiredProps = [
            'constructor',
            'getPrivateBaseKey',
            'getPrivateBaseKeyB64',
            'getPrivateKey',
            'getPublicBaseKey',
            'getPublicBaseKeyB64',
            'getPublicKey',
            'parseKey',
            'parsePropertiesFrom'
        ];

        // 检查对象是否存在且为对象类型
        if (!obj || typeof obj !== 'object') {
            return false;
        }

        // 检查所有必需属性是否存在
        for (const prop of requiredProps) {
            if (!(prop in obj)) {
                return false;
            }
        }

        return true;
    }

    let temp_call = Function.prototype.call;

    Function.prototype.call = function () {
        if (arguments.length === 1 && arguments[0] && arguments[0].__proto__ && typeof arguments[0].__proto__ === 'object' && hasRSAProp(arguments[0].__proto__)) {
            if ("__proto__" in arguments[0].__proto__ && arguments[0].__proto__.__proto__ && Object.hasOwn(arguments[0].__proto__.__proto__, "encrypt") && Object.hasOwn(arguments[0].__proto__.__proto__, "decrypt")) {
                if (arguments[0].__proto__.__proto__.encrypt.toString().indexOf('RSA加密') === -1) {

                    let temp_encrypt = arguments[0].__proto__.__proto__.encrypt;

                    arguments[0].__proto__.__proto__.encrypt = function () {
                        let encrypt_text = temp_encrypt.bind(this, ...arguments)();

                        console.log("RSA 公钥:\n", this.getPublicKey());
                        console.log("RSA加密 原始数据:", ...arguments);
                        console.log("RSA加密 密文:", encrypt_text);

                        let url = "http://127.0.0.1:5000/request?text=" + arguments[0];
                        let xhr = new XMLHttpRequest();
                        xhr.open("GET", url, false);
                        xhr.send();
                        return encrypt_text;
                    }
                }
                if (arguments[0].__proto__.__proto__.decrypt.toString().indexOf('RSA解密') === -1) {

                    let temp_decrypt = arguments[0].__proto__.__proto__.decrypt;

                    arguments[0].__proto__.__proto__.decrypt = function () {
                        let decrypt_text = temp_decrypt.bind(this, ...arguments)();

                        console.log("RSA 私钥:\n", this.getPrivateKey());
                        console.log("RSA解密 原始数据:", ...arguments);
                        console.log("RSA解密 明文:", decrypt_text);
                        return decrypt_text;
                    }
                }
            }
        }
        return temp_call.bind(this, ...arguments)();
    }
})();
加密的时候我们就将原始数据发送给本地服务器,现在我们来看一下效果。触发加密:

发送原始数据到本地服务端:

获取原始数据:

可以看到整个步骤都按照原计划进行,非常完美。
这里忘了说了,图里的后台管理系统是我让deepseek写的一个小型靶场,这里我也分享给大家,同时它也将作为本文的测试站点:
<?php
// RSA私钥
$privateKey = <<<EOD
-----BEGIN PRIVATE KEY-----
MIICdQIBADANBgkqhkiG9w0BAQEFAASCAl8wggJbAgEAAoGBALeCvaMTmj3pJ6K2
q0MhQMM0rZRH/ab4mtteiuNhOKth9uRTmIwf4L+LPNIQ4V/kUATOadRhxsROa+uz
YmTY2qAZGt681Y+qjyPHwsq5fbmqcMOdgFlCHGG30LAkHewsBZNNnuMn1wKo3wk9
omldaU6LV7cj7CjwvKbA/S6f+UlbAgMBAAECgYBMnddTGMITCx8zPhTu6BlD5uB5
wjzS04TEBgryuAqS80nDNmvARSbukdGI2uddw9Lszsk8lL4KA7vnInP4KtnLvPCt
OV0ImHwe0dvA2Uwpa5JxHh7ixjEivaW0n1jmy+bitvnxGCYJmR90rjHQpDGF7wo/
mFcUK6hlpbQxDPVdkQJBANrOVBdp+R7muyCdAsxpqZhwT7+NZ43UJC/PYYzMNX+k
62Mv8HXcbazTK3YkF8hsvJ0MBkfiG62Ge/LEkf+Q3IcCQQDWtHxUwARyM+UpzwZu
7ka/4C+/704+fY+h75WJlsdNBhVrjzAzdLMLRKP/592fhRxlHZ2i/5/YmoIFiRqp
EVWNAkBJXtaj400+J3CoRv4hPW05SK/1M5192Z0oywmTBQcLfmnQIMspOnkscsMo
IoI3Gv9ESjvw7skJLwdxKKksYY8RAkAUulHygKMtP1NVaPYvCXPtHECf4AOGxupx
8MZYBSVyiy7QNn+pyA9s/BB1KTZdKyWloWlRjiopaCk7TZQ0VEcVAkBA7CjAF/F7
9JhiOOneHBHo729frpo5oWukBmQM82RoYnxDhhe4XdFu1LtUjINYOSlwX12ua9/c
m2plLaZFhw4W
-----END PRIVATE KEY-----
EOD;

// 处理登录请求
if ($_SERVER['REQUEST_METHOD'] === 'POST') {
    header('Content-Type: application/json');

    // 从 JSON 读取数据
    $rawData = file_get_contents("php://input");
    $jsonData = json_decode($rawData, true);

    $encryptedUsername = $jsonData['username'] ?? '';
    $encryptedPassword = $jsonData['password'] ?? '';

    $response = ['success' => false];

    if (empty($encryptedUsername) || empty($encryptedPassword)) {
        $response['message'] = '未接收到加密数据';
        echo json_encode($response);
        exit;
    }

    function rsaDecrypt($encryptedData, $privateKey) {
        $decrypted = '';
        openssl_private_decrypt(base64_decode($encryptedData), $decrypted, $privateKey);
        return $decrypted;
    }

    try {
        $username = rsaDecrypt($encryptedUsername, $privateKey);
        $password = rsaDecrypt($encryptedPassword, $privateKey);

        if ($username === 'admin' && $password === 'admin') {
            $response['success'] = true;
            $response['message'] = '登录成功';
        } else {
            $response['message'] = '账号或密码错误';
        }
    } catch (Exception $e) {
        $response['message'] = '解密失败: ' . $e->getMessage();
    }

    echo json_encode($response);
    exit;
}
?>
<!DOCTYPE html>
<html lang="zh-CN">
<head>
    <meta charset="UTF-8">
    <meta name="viewport" content="width=device-width, initial-scale=1.0">
    <title>后台管理</title>
    <script src="jsencrypt.js"></script>
    <style>
        /* 样式保持不变 */
        * { margin: 0; padding: 0; box-sizing: border-box; font-family: 'Segoe UI', Tahoma, Geneva, Verdana, sans-serif; }
        body { background: linear-gradient(135deg, #6a11cb 0%, #2575fc 100%); height: 100vh; display: flex; justify-content: center; align-items: center; color: #333; }
        .container { width: 100%; max-width: 450px; padding: 20px; }
        .login-card { background-color: white; border-radius: 12px; box-shadow: 0 10px 30px rgba(0, 0, 0, 0.2); padding: 40px 30px; text-align: center; }
        .logo { margin-bottom: 30px; }
        .logo h1 { color: #2c3e50; font-size: 28px; margin-bottom: 8px; }
        .form-group { margin-bottom: 20px; text-align: left; }
        .form-group label { display: block; margin-bottom: 8px; font-weight: 600; color: #2c3e50; }
        .form-group input { width: 100%; padding: 12px 15px; border: 2px solid #e1e8ed; border-radius: 8px; font-size: 16px; transition: all 0.3s ease; }
        .btn { background: linear-gradient(135deg, #6a11cb 0%, #2575fc 100%); color: white; border: none; border-radius: 8px; padding: 14px 20px; font-size: 16px; font-weight: 600; cursor: pointer; width: 100%; transition: all 0.3s ease; margin-top: 10px; }
        .result { margin-top: 20px; padding: 15px; border-radius: 8px; font-weight: 500; display: none; }
        .success { background-color: #d4edda; color: #155724; border: 1px solid #c3e6cb; }
        .error { background-color: #f8d7da; color: #721c24; border: 1px solid #f5c6cb; }
    </style>
</head>
<body>
<div class="container">
    <div class="login-card">
        <div class="logo">
            <h1>后台管理</h1>
        </div>

        <form id="loginForm">
            <div class="form-group">
                <label for="username">账号</label>
                <input type="text" id="username" placeholder="请输入账号" required>
            </div>

            <div class="form-group">
                <label for="password">密码</label>
                <input type="password" id="password" placeholder="请输入密码" required>
            </div>

            <button type="submit" class="btn">登录</button>
        </form>

        <div id="result" class="result"></div>
    </div>
</div>

<script>
document.addEventListener('DOMContentLoaded', function() {
    const loginForm = document.getElementById('loginForm');
    const resultDiv = document.getElementById('result');

    const publicKey = `-----BEGIN PUBLIC KEY-----
MIGfMA0GCSqGSIb3DQEBAQUAA4GNADCBiQKBgQC3gr2jE5o96SeitqtDIUDDNK2U
R/2m+JrbXorjYTirYfbkU5iMH+C/izzSEOFf5FAEzmnUYcbETmvrs2Jk2NqgGRre
vNWPqo8jx8LKuX25qnDDnYBZQhxht9CwJB3sLAWTTZ7jJ9cCqN8JPaJpXWlOi1e3
I+wo8LymwP0un/lJWwIDAQAB
-----END PUBLIC KEY-----`;

    loginForm.addEventListener('submit', async function(e) {
        e.preventDefault();

        const username = document.getElementById('username').value;
        const password = document.getElementById('password').value;

        const encrypt = new JSEncrypt();
        encrypt.setPublicKey(publicKey);

        const encryptedUsername = encrypt.encrypt(username);
        const encryptedPassword = encrypt.encrypt(password);

        const payload = {
            username: encryptedUsername,
            password: encryptedPassword
        };

        try {
            const response = await fetch('<?php echo $_SERVER['PHP_SELF']; ?>', {
                method: 'POST',
                headers: { 'Content-Type': 'application/json' },
                body: JSON.stringify(payload)
            });

            const data = await response.json();

            if (data.success) {
                resultDiv.textContent = '登录成功!账号密码验证正确。';
                resultDiv.className = 'result success';
            } else {
                resultDiv.textContent = '登录失败!' + data.message;
                resultDiv.className = 'result error';
            }
        } catch (error) {
            resultDiv.textContent = '请求失败:' + error.message;
            resultDiv.className = 'result error';
        }

        resultDiv.style.display = 'block';
    });
});
</script>
</body>
</html>需要注意的是,该靶场需要自行将jsencrypt库保存到站点目录下。

靶场将会对账号和密码进行RSA加密:

0x05 下游mitmproxy代理实现解密
废话不多说直接上代码:
# -*- coding: UTF-8 -*-
# @Project :JS逆向
# @File    :downstream.py
# Author   :0xsdeo
# Date     :2025/11/3 15:22
import json
import requests
from mitmproxy.http import HTTPFlow


def request(flow: HTTPFlow):
    if "testrsa.com" in flow.request.url and flow.request.method == "POST":
        re = requests.get("http://127.0.0.1:5000/get")
        text = json.loads(re.text)

        data = json.loads(flow.request.content.decode())
        # 将账号加密后的密文修改为原始数据
        data['username'] = text[0]
        # 将密码加密后的密文修改为原始数据
        data['password'] = text[1]
        flow.request.content = json.dumps(data).encode()
        print(flow.request.content.decode())
mitmdump命令:
mitmdump -q -p 8888 -s downstream.py --mode upstream:http://127.0.0.1:8080/ --ssl-insecure效果:

burp:

成功实现下游mitmproxy代理解密。
0x06 上游mitmproxy代理实现加密
直接上代码:
# -*- coding: UTF-8 -*-
# @Project :JS逆向
# @File    :upstream.py
# Author   :0xsdeo
# Date     :2025/11/3 15:22
import json
from mitmproxy.http import HTTPFlow
from Crypto.PublicKey import RSA
from Crypto.Cipher import PKCS1_v1_5
import base64

public_key_str = """-----BEGIN PUBLIC KEY-----
MIGfMA0GCSqGSIb3DQEBAQUAA4GNADCBiQKBgQC3gr2jE5o96SeitqtDIUDDNK2U
R/2m+JrbXorjYTirYfbkU5iMH+C/izzSEOFf5FAEzmnUYcbETmvrs2Jk2NqgGRre
vNWPqo8jx8LKuX25qnDDnYBZQhxht9CwJB3sLAWTTZ7jJ9cCqN8JPaJpXWlOi1e3
I+wo8LymwP0un/lJWwIDAQAB
-----END PUBLIC KEY-----
"""


def rsa_encrypt(text: str) -> str:
    key = RSA.import_key(public_key_str)
    cipher = PKCS1_v1_5.new(key)
    encrypted = cipher.encrypt(text.encode('utf-8'))
    return base64.b64encode(encrypted).decode('utf-8')


def request(flow: HTTPFlow):
    if "testrsa.com" in flow.request.url and flow.request.method == "POST":
        data = json.loads(flow.request.content.decode())
        # 加密原始username
        data['username'] = rsa_encrypt(data['username'])
        # 加密原始password
        data['password'] = rsa_encrypt(data['password'])
        flow.request.content = json.dumps(data).encode()
        print(flow.request.content.decode())
上游mitmdump启动命令:
mitmdump -q -p 8989 -s upstream.py效果:


成功实现自动化加解密。
注:这里的公钥通过我的hook脚本就能获取到:

完。


 会员专属
会员专属
请登录后查看评论内容